View Source Code | View Slides
05. PyTorch Going Modular
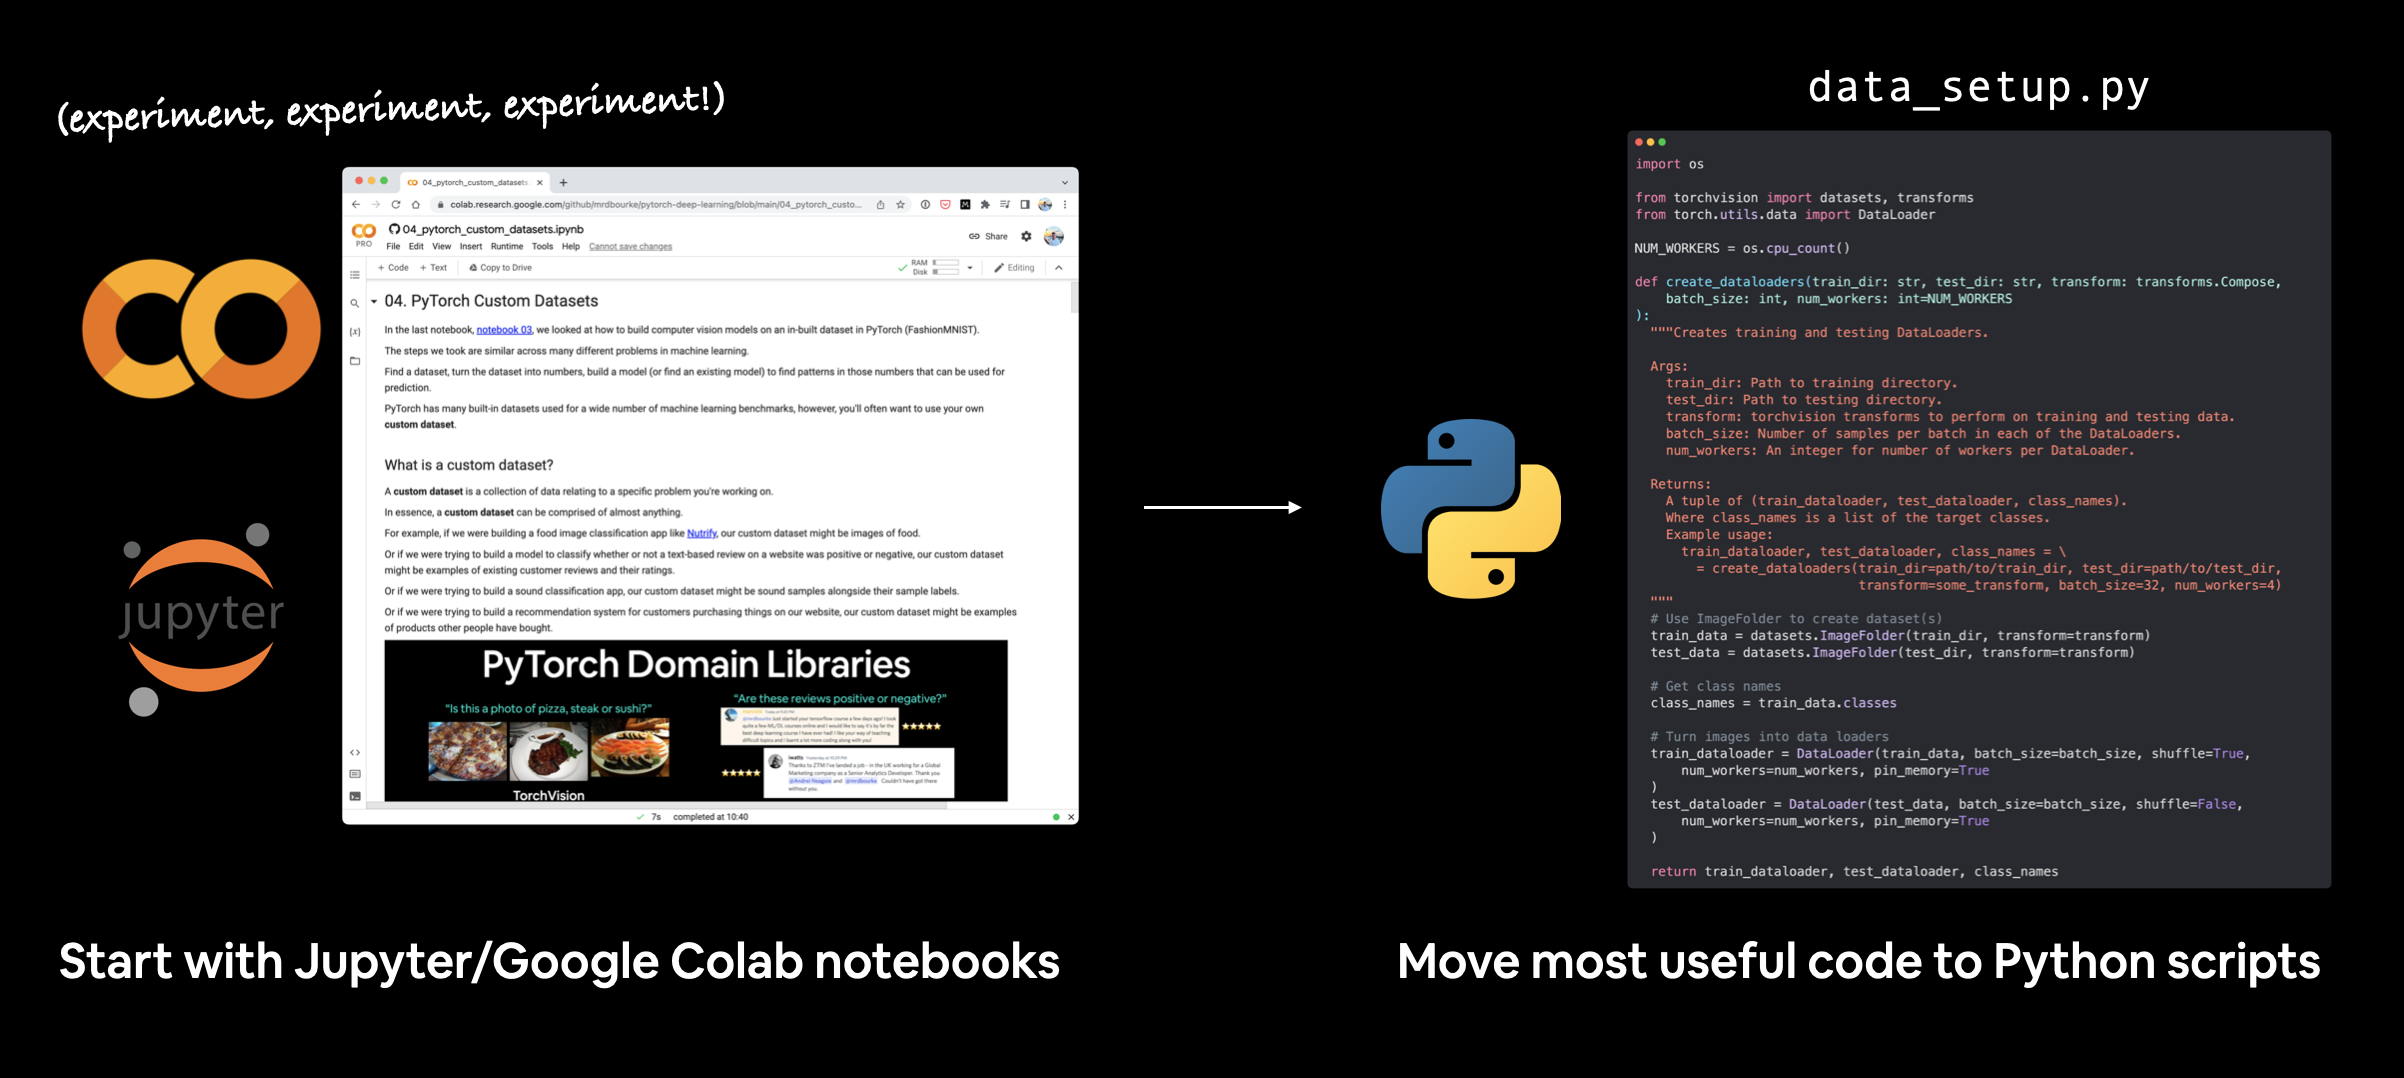
This section answers the question, "how do I turn my notebook code into Python scripts?"
To do so, we're going to turn the most useful code cells in notebook 04. PyTorch Custom Datasets into a series of Python scripts saved to a directory called going_modular.
What is going modular?
Going modular involves turning notebook code (from a Jupyter Notebook or Google Colab notebook) into a series of different Python scripts that offer similar functionality.
For example, we could turn our notebook code from a series of cells into the following Python files:
data_setup.py- a file to prepare and download data if needed.engine.py- a file containing various training functions.model_builder.pyormodel.py- a file to create a PyTorch model.train.py- a file to leverage all other files and train a target PyTorch model.utils.py- a file dedicated to helpful utility functions.
Note: The naming and layout of the above files will depend on your use case and code requirements. Python scripts are as general as individual notebook cells, meaning, you could create one for almost any kind of functionality.
Why would you want to go modular?
Notebooks are fantastic for iteratively exploring and running experiments quickly.
However, for larger scale projects you may find Python scripts more reproducible and easier to run.
Though this is a debated topic, as companies like Netflix have shown how they use notebooks for production code.
Production code is code that runs to offer a service to someone or something.
For example, if you have an app running online that other people can access and use, the code running that app is considered production code.
And libraries like fast.ai's nb-dev (short for notebook development) enable you to write whole Python libraries (including documentation) with Jupyter Notebooks.
Pros and cons of notebooks vs Python scripts
There's arguments for both sides.
But this list sums up a few of the main topics.
| Pros | Cons | |
|---|---|---|
| Notebooks | Easy to experiment/get started | Versioning can be hard |
| Easy to share (e.g. a link to a Google Colab notebook) | Hard to use only specific parts | |
| Very visual | Text and graphics can get in the way of code |
| Pros | Cons | |
|---|---|---|
| Python scripts | Can package code together (saves rewriting similar code across different notebooks) | Experimenting isn't as visual (usually have to run the whole script rather than one cell) |
| Can use git for versioning | ||
| Many open source projects use scripts | ||
| Larger projects can be run on cloud vendors (not as much support for notebooks) |
My workflow
I usually start machine learning projects in Jupyter/Google Colab notebooks for quick experimentation and visualization.
Then when I've got something working, I move the most useful pieces of code to Python scripts.
There are many possible workflows for writing machine learning code. Some prefer to start with scripts, others (like me) prefer to start with notebooks and go to scripts later on.
PyTorch in the wild
In your travels, you'll see many code repositories for PyTorch-based ML projects have instructions on how to run the PyTorch code in the form of Python scripts.
For example, you might be instructed to run code like the following in a terminal/command line to train a model:
python train.py --model MODEL_NAME --batch_size BATCH_SIZE --lr LEARNING_RATE --num_epochs NUM_EPOCHS

Running a PyTorch train.py script on the command line with various hyperparameter settings.
In this case, train.py is the target Python script, it'll likely contain functions to train a PyTorch model.
And --model, --batch_size, --lr and --num_epochs are known as argument flags.
You can set these to whatever values you like and if they're compatible with train.py, they'll work, if not, they'll error.
For example, let's say we wanted to train our TinyVGG model from notebook 04 for 10 epochs with a batch size of 32 and a learning rate of 0.001:
python train.py --model tinyvgg --batch_size 32 --lr 0.001 --num_epochs 10
You could setup any number of these argument flags in your train.py script to suit your needs.
The PyTorch blog post for training state-of-the-art computer vision models uses this style.
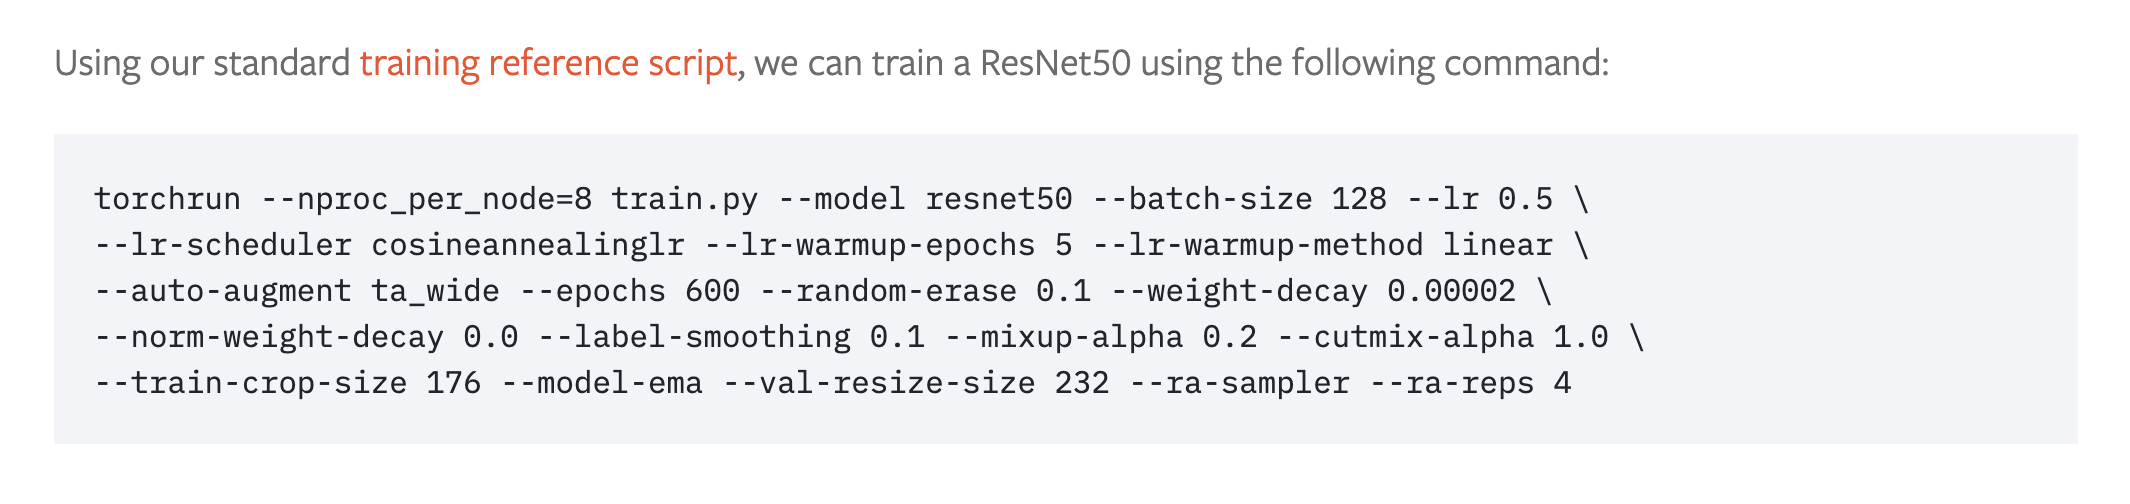
PyTorch command line training script recipe for training state-of-the-art computer vision models with 8 GPUs. Source: PyTorch blog.
What we're going to cover
The main concept of this section is: turn useful notebook code cells into reusable Python files.
Doing this will save us writing the same code over and over again.
There are two notebooks for this section:
- 05. Going Modular: Part 1 (cell mode) - this notebook is run as a traditional Jupyter Notebook/Google Colab notebook and is a condensed version of notebook 04.
- 05. Going Modular: Part 2 (script mode) - this notebook is the same as number 1 but with added functionality to turn each of the major sections into Python scripts, such as,
data_setup.pyandtrain.py.
The text in this document focuses on the code cells 05. Going Modular: Part 2 (script mode), the ones with %%writefile ... at the top.
Why two parts?
Because sometimes the best way to learn something is to see how it differs from something else.
If you run each notebook side-by-side you'll see how they differ and that's where the key learnings are.
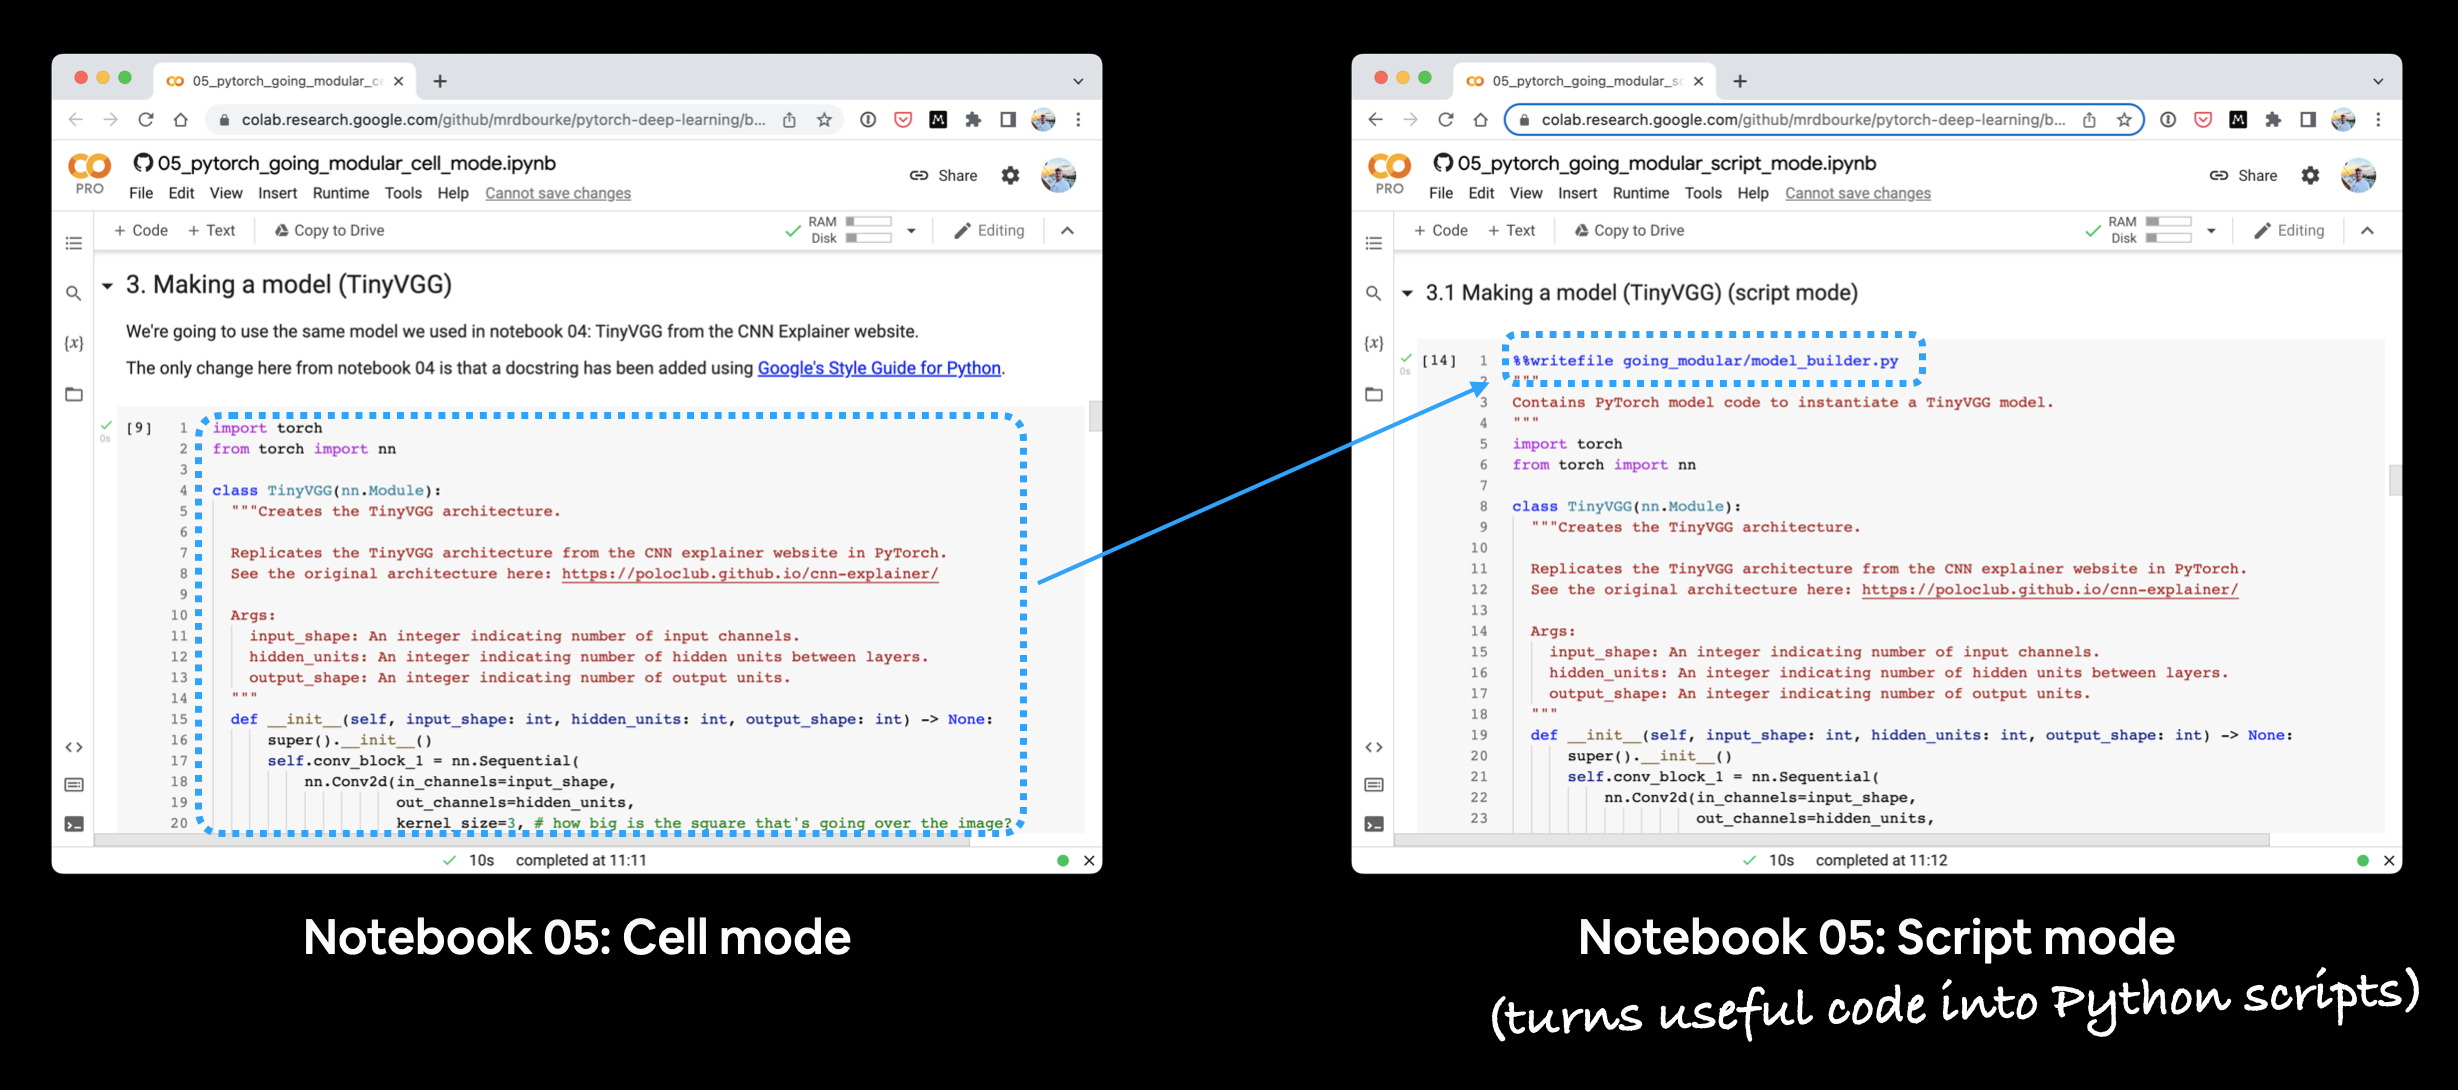
Running the two notebooks for section 05 side-by-side. You'll notice that the script mode notebook has extra code cells to turn code from the cell mode notebook into Python scripts.
What we're working towards
By the end of this section we want to have two things:
- The ability to train the model we built in notebook 04 (Food Vision Mini) with one line of code on the command line:
python train.py. - A directory structure of reusable Python scripts, such as:
going_modular/
├── going_modular/
│   ├── data_setup.py
│   ├── engine.py
│   ├── model_builder.py
│   ├── train.py
│   └── utils.py
├── models/
│   ├── 05_going_modular_cell_mode_tinyvgg_model.pth
│   └── 05_going_modular_script_mode_tinyvgg_model.pth
└── data/
    └── pizza_steak_sushi/
        ├── train/
        │   ├── pizza/
        │   │   ├── image01.jpeg
        │   │   └── ...
        │   ├── steak/
        │   └── sushi/
        └── test/
            ├── pizza/
            ├── steak/
            └── sushi/
Things to note
- Docstrings - Writing reproducible and understandable code is important. And with this in mind, each of the functions/classes we'll be putting into scripts has been created with Google's Python docstring style in mind.
- Imports at the top of scripts - Since all of the Python scripts we're going to create could be considered a small program on their own, all of the scripts require their input modules be imported at the start of the script for example:
# Import modules required for train.py
import os
import torch
import data_setup, engine, model_builder, utils

from torchvision import transforms
Where can you get help?
All of the materials for this course are available on GitHub.
If you run into trouble, you can ask a question on the course GitHub Discussions page.
And of course, there's the PyTorch documentation and PyTorch developer forums, a very helpful place for all things PyTorch.
0. Cell mode vs. script mode
A cell mode notebook such as 05. Going Modular Part 1 (cell mode) is a notebook run normally, each cell in the notebook is either code or markdown.
A script mode notebook such as 05. Going Modular Part 2 (script mode) is very similar to a cell mode notebook, however, many of the code cells may be turned into Python scripts.
Note: You don't need to create Python scripts via a notebook, you can create them directly through an IDE (integrated developer environment) such as VS Code. Having the script mode notebook as part of this section is just to demonstrate one way of going from notebooks to Python scripts.
1. Get data
Getting the data in each of the 05 notebooks happens the same as in notebook 04.
A call is made to GitHub via Python's requests module to download a .zip file and unzip it.
import os
import requests
import zipfile
from pathlib import Path

# Setup path to data folder
data_path = Path("data/")
image_path = data_path / "pizza_steak_sushi"

# If the image folder doesn't exist, download it and prepare it...
if image_path.is_dir():
    print(f"{image_path} directory exists.")
else:
    print(f"Did not find {image_path} directory, creating one...")
    image_path.mkdir(parents=True, exist_ok=True)

# Download pizza, steak, sushi data
with open(data_path / "pizza_steak_sushi.zip", "wb") as f:
    request = requests.get("https://github.com/mrdbourke/pytorch-deep-learning/raw/main/data/pizza_steak_sushi.zip")
    print("Downloading pizza, steak, sushi data...")
    f.write(request.content)

# Unzip pizza, steak, sushi data
with zipfile.ZipFile(data_path / "pizza_steak_sushi.zip", "r") as zip_ref:
    print("Unzipping pizza, steak, sushi data...")
    zip_ref.extractall(image_path)

# Remove zip file
os.remove(data_path / "pizza_steak_sushi.zip")
This results in having a file called data that contains another directory called pizza_steak_sushi with images of pizza, steak and sushi in standard image classification format.
data/
└── pizza_steak_sushi/
    ├── train/
    │   ├── pizza/
    │   │   ├── train_image01.jpeg
    │   │   ├── test_image02.jpeg
    │   │   └── ...
    │   ├── steak/
    │   │   └── ...
    │   └── sushi/
    │       └── ...
    └── test/
        ├── pizza/
        │   ├── test_image01.jpeg
        │   └── test_image02.jpeg
        ├── steak/
        └── sushi/
2. Create Datasets and DataLoaders (data_setup.py)
Once we've got data, we can then turn it into PyTorch Dataset's and DataLoader's (one for training data and one for testing data).
We convert the useful Dataset and DataLoader creation code into a function called create_dataloaders().
And we write it to file using the line %%writefile going_modular/data_setup.py.
%%writefile going_modular/data_setup.py
"""
Contains functionality for creating PyTorch DataLoaders for
image classification data.
"""
import os

from torchvision import datasets, transforms
from torch.utils.data import DataLoader

NUM_WORKERS = os.cpu_count()

def create_dataloaders(
    train_dir: str,
    test_dir: str,
    transform: transforms.Compose,
    batch_size: int,
    num_workers: int=NUM_WORKERS
):
  """Creates training and testing DataLoaders.

  Takes in a training directory and testing directory path and turns
  them into PyTorch Datasets and then into PyTorch DataLoaders.

  Args:
    train_dir: Path to training directory.
    test_dir: Path to testing directory.
    transform: torchvision transforms to perform on training and testing data.
    batch_size: Number of samples per batch in each of the DataLoaders.
    num_workers: An integer for number of workers per DataLoader.

  Returns:
    A tuple of (train_dataloader, test_dataloader, class_names).
    Where class_names is a list of the target classes.
    Example usage:
      train_dataloader, test_dataloader, class_names = \
        = create_dataloaders(train_dir=path/to/train_dir,
                             test_dir=path/to/test_dir,
                             transform=some_transform,
                             batch_size=32,
                             num_workers=4)
  """
  # Use ImageFolder to create dataset(s)
  train_data = datasets.ImageFolder(train_dir, transform=transform)
  test_data = datasets.ImageFolder(test_dir, transform=transform)

  # Get class names
  class_names = train_data.classes

  # Turn images into data loaders
  train_dataloader = DataLoader(
      train_data,
      batch_size=batch_size,
      shuffle=True,
      num_workers=num_workers,
      pin_memory=True,
  )
  test_dataloader = DataLoader(
      test_data,
      batch_size=batch_size,
      shuffle=False, # don't need to shuffle test data
      num_workers=num_workers,
      pin_memory=True,
  )

  return train_dataloader, test_dataloader, class_names
If we'd like to make DataLoader's we can now use the function within data_setup.py like so:
# Import data_setup.py
from going_modular import data_setup

# Create train/test dataloader and get class names as a list
train_dataloader, test_dataloader, class_names = data_setup.create_dataloaders(...)
3. Making a model (model_builder.py)
Over the past few notebooks (notebook 03 and notebook 04), we've built the TinyVGG model a few times.
So it makes sense to put the model into its file so we can reuse it again and again.
Let's put our TinyVGG() model class into a script with the line %%writefile going_modular/model_builder.py:
%%writefile going_modular/model_builder.py
"""
Contains PyTorch model code to instantiate a TinyVGG model.
"""
import torch
from torch import nn

class TinyVGG(nn.Module):
  """Creates the TinyVGG architecture.

  Replicates the TinyVGG architecture from the CNN explainer website in PyTorch.
  See the original architecture here: https://poloclub.github.io/cnn-explainer/

  Args:
    input_shape: An integer indicating number of input channels.
    hidden_units: An integer indicating number of hidden units between layers.
    output_shape: An integer indicating number of output units.
  """
  def __init__(self, input_shape: int, hidden_units: int, output_shape: int) -> None:
      super().__init__()
      self.conv_block_1 = nn.Sequential(
          nn.Conv2d(in_channels=input_shape,
                    out_channels=hidden_units,
                    kernel_size=3,
                    stride=1,
                    padding=0),
          nn.ReLU(),
          nn.Conv2d(in_channels=hidden_units,
                    out_channels=hidden_units,
                    kernel_size=3,
                    stride=1,
                    padding=0),
          nn.ReLU(),
          nn.MaxPool2d(kernel_size=2,
                        stride=2)
      )
      self.conv_block_2 = nn.Sequential(
          nn.Conv2d(hidden_units, hidden_units, kernel_size=3, padding=0),
          nn.ReLU(),
          nn.Conv2d(hidden_units, hidden_units, kernel_size=3, padding=0),
          nn.ReLU(),
          nn.MaxPool2d(2)
      )
      self.classifier = nn.Sequential(
          nn.Flatten(),
          # Where did this in_features shape come from?
          # It's because each layer of our network compresses and changes the shape of our inputs data.
          nn.Linear(in_features=hidden_units*13*13,
                    out_features=output_shape)
      )

  def forward(self, x: torch.Tensor):
      x = self.conv_block_1(x)
      x = self.conv_block_2(x)
      x = self.classifier(x)
      return x
      # return self.classifier(self.conv_block_2(self.conv_block_1(x))) # <- leverage the benefits of operator fusion
Now instead of coding the TinyVGG model from scratch every time, we can import it using:
import torch
# Import model_builder.py
from going_modular import model_builder
device = "cuda" if torch.cuda.is_available() else "cpu"

# Instantiate an instance of the model from the "model_builder.py" script
torch.manual_seed(42)
model = model_builder.TinyVGG(input_shape=3,
                              hidden_units=10,
                              output_shape=len(class_names)).to(device)
4. Creating train_step() and test_step() functions and train() to combine them
We wrote several training functions in notebook 04:
train_step()- takes in a model, aDataLoader, a loss function and an optimizer and trains the model on theDataLoader.test_step()- takes in a model, aDataLoaderand a loss function and evaluates the model on theDataLoader.train()- performs 1. and 2. together for a given number of epochs and returns a results dictionary.
Since these will be the engine of our model training, we can put them all into a Python script called engine.py with the line %%writefile going_modular/engine.py:
%%writefile going_modular/engine.py
"""
Contains functions for training and testing a PyTorch model.
"""
import torch

from tqdm.auto import tqdm
from typing import Dict, List, Tuple

def train_step(model: torch.nn.Module,
               dataloader: torch.utils.data.DataLoader,
               loss_fn: torch.nn.Module,
               optimizer: torch.optim.Optimizer,
               device: torch.device) -> Tuple[float, float]:
  """Trains a PyTorch model for a single epoch.

  Turns a target PyTorch model to training mode and then
  runs through all of the required training steps (forward
  pass, loss calculation, optimizer step).

  Args:
    model: A PyTorch model to be trained.
    dataloader: A DataLoader instance for the model to be trained on.
    loss_fn: A PyTorch loss function to minimize.
    optimizer: A PyTorch optimizer to help minimize the loss function.
    device: A target device to compute on (e.g. "cuda" or "cpu").

  Returns:
    A tuple of training loss and training accuracy metrics.
    In the form (train_loss, train_accuracy). For example:

    (0.1112, 0.8743)
  """
  # Put model in train mode
  model.train()

  # Setup train loss and train accuracy values
  train_loss, train_acc = 0, 0

  # Loop through data loader data batches
  for batch, (X, y) in enumerate(dataloader):
      # Send data to target device
      X, y = X.to(device), y.to(device)

      # 1. Forward pass
      y_pred = model(X)

      # 2. Calculate  and accumulate loss
      loss = loss_fn(y_pred, y)
      train_loss += loss.item()

      # 3. Optimizer zero grad
      optimizer.zero_grad()

      # 4. Loss backward
      loss.backward()

      # 5. Optimizer step
      optimizer.step()

      # Calculate and accumulate accuracy metric across all batches
      y_pred_class = torch.argmax(torch.softmax(y_pred, dim=1), dim=1)
      train_acc += (y_pred_class == y).sum().item()/len(y_pred)

  # Adjust metrics to get average loss and accuracy per batch
  train_loss = train_loss / len(dataloader)
  train_acc = train_acc / len(dataloader)
  return train_loss, train_acc

def test_step(model: torch.nn.Module,
              dataloader: torch.utils.data.DataLoader,
              loss_fn: torch.nn.Module,
              device: torch.device) -> Tuple[float, float]:
  """Tests a PyTorch model for a single epoch.

  Turns a target PyTorch model to "eval" mode and then performs
  a forward pass on a testing dataset.

  Args:
    model: A PyTorch model to be tested.
    dataloader: A DataLoader instance for the model to be tested on.
    loss_fn: A PyTorch loss function to calculate loss on the test data.
    device: A target device to compute on (e.g. "cuda" or "cpu").

  Returns:
    A tuple of testing loss and testing accuracy metrics.
    In the form (test_loss, test_accuracy). For example:

    (0.0223, 0.8985)
  """
  # Put model in eval mode
  model.eval()

  # Setup test loss and test accuracy values
  test_loss, test_acc = 0, 0

  # Turn on inference context manager
  with torch.inference_mode():
      # Loop through DataLoader batches
      for batch, (X, y) in enumerate(dataloader):
          # Send data to target device
          X, y = X.to(device), y.to(device)

          # 1. Forward pass
          test_pred_logits = model(X)

          # 2. Calculate and accumulate loss
          loss = loss_fn(test_pred_logits, y)
          test_loss += loss.item()

          # Calculate and accumulate accuracy
          test_pred_labels = test_pred_logits.argmax(dim=1)
          test_acc += ((test_pred_labels == y).sum().item()/len(test_pred_labels))

  # Adjust metrics to get average loss and accuracy per batch
  test_loss = test_loss / len(dataloader)
  test_acc = test_acc / len(dataloader)
  return test_loss, test_acc

def train(model: torch.nn.Module,
          train_dataloader: torch.utils.data.DataLoader,
          test_dataloader: torch.utils.data.DataLoader,
          optimizer: torch.optim.Optimizer,
          loss_fn: torch.nn.Module,
          epochs: int,
          device: torch.device) -> Dict[str, List]:
  """Trains and tests a PyTorch model.

  Passes a target PyTorch models through train_step() and test_step()
  functions for a number of epochs, training and testing the model
  in the same epoch loop.

  Calculates, prints and stores evaluation metrics throughout.

  Args:
    model: A PyTorch model to be trained and tested.
    train_dataloader: A DataLoader instance for the model to be trained on.
    test_dataloader: A DataLoader instance for the model to be tested on.
    optimizer: A PyTorch optimizer to help minimize the loss function.
    loss_fn: A PyTorch loss function to calculate loss on both datasets.
    epochs: An integer indicating how many epochs to train for.
    device: A target device to compute on (e.g. "cuda" or "cpu").

  Returns:
    A dictionary of training and testing loss as well as training and
    testing accuracy metrics. Each metric has a value in a list for
    each epoch.
    In the form: {train_loss: [...],
                  train_acc: [...],
                  test_loss: [...],
                  test_acc: [...]}
    For example if training for epochs=2:
                 {train_loss: [2.0616, 1.0537],
                  train_acc: [0.3945, 0.3945],
                  test_loss: [1.2641, 1.5706],
                  test_acc: [0.3400, 0.2973]}
  """
  # Create empty results dictionary
  results = {"train_loss": [],
      "train_acc": [],
      "test_loss": [],
      "test_acc": []
  }

  # Loop through training and testing steps for a number of epochs
  for epoch in tqdm(range(epochs)):
      train_loss, train_acc = train_step(model=model,
                                          dataloader=train_dataloader,
                                          loss_fn=loss_fn,
                                          optimizer=optimizer,
                                          device=device)
      test_loss, test_acc = test_step(model=model,
          dataloader=test_dataloader,
          loss_fn=loss_fn,
          device=device)

      # Print out what's happening
      print(
          f"Epoch: {epoch+1} | "
          f"train_loss: {train_loss:.4f} | "
          f"train_acc: {train_acc:.4f} | "
          f"test_loss: {test_loss:.4f} | "
          f"test_acc: {test_acc:.4f}"
      )

      # Update results dictionary
      results["train_loss"].append(train_loss)
      results["train_acc"].append(train_acc)
      results["test_loss"].append(test_loss)
      results["test_acc"].append(test_acc)

  # Return the filled results at the end of the epochs
  return results
Now we've got the engine.py script, we can import functions from it via:
# Import engine.py
from going_modular import engine

# Use train() by calling it from engine.py
engine.train(...)
5. Creating a function to save the model (utils.py)
Often you'll want to save a model whilst it's training or after training.
Since we've written the code to save a model a few times now in previous notebooks, it makes sense to turn it into a function and save it to file.
It's common practice to store helper functions in a file called utils.py (short for utilities).
Let's save our save_model() function to a file called utils.py with the line %%writefile going_modular/utils.py:
%%writefile going_modular/utils.py
"""
Contains various utility functions for PyTorch model training and saving.
"""
import torch
from pathlib import Path

def save_model(model: torch.nn.Module,
               target_dir: str,
               model_name: str):
  """Saves a PyTorch model to a target directory.

  Args:
    model: A target PyTorch model to save.
    target_dir: A directory for saving the model to.
    model_name: A filename for the saved model. Should include
      either ".pth" or ".pt" as the file extension.

  Example usage:
    save_model(model=model_0,
               target_dir="models",
               model_name="05_going_modular_tingvgg_model.pth")
  """
  # Create target directory
  target_dir_path = Path(target_dir)
  target_dir_path.mkdir(parents=True,
                        exist_ok=True)

  # Create model save path
  assert model_name.endswith(".pth") or model_name.endswith(".pt"), "model_name should end with '.pt' or '.pth'"
  model_save_path = target_dir_path / model_name

  # Save the model state_dict()
  print(f"[INFO] Saving model to: {model_save_path}")
  torch.save(obj=model.state_dict(),
             f=model_save_path)
Now if we wanted to use our save_model() function, instead of writing it all over again, we can import it and use it via:
# Import utils.py
from going_modular import utils

# Save a model to file
save_model(model=...
           target_dir=...,
           model_name=...)
6. Train, evaluate and save the model (train.py)
As previously discussed, you'll often come across PyTorch repositories that combine all of their functionality together in a train.py file.
This file is essentially saying "train the model using whatever data is available".
In our train.py file, we'll combine all of the functionality of the other Python scripts we've created and use it to train a model.
This way we can train a PyTorch model using a single line of code on the command line:
python train.py
To create train.py we'll go through the following steps:
- Import the various dependencies, namely
torch,os,torchvision.transformsand all of the scripts from thegoing_modulardirectory,data_setup,engine,model_builder,utils. - Note: Since
train.pywill be inside thegoing_modulardirectory, we can import the other modules viaimport ...rather thanfrom going_modular import .... - Setup various hyperparameters such as batch size, number of epochs, learning rate and number of hidden units (these could be set in the future via Python's
argparse). - Setup the training and test directories.
- Setup device-agnostic code.
- Create the necessary data transforms.
- Create the DataLoaders using
data_setup.py. - Create the model using
model_builder.py. - Setup the loss function and optimizer.
- Train the model using
engine.py. - Save the model using
utils.py.
And we can create the file from a notebook cell using the line %%writefile going_modular/train.py:
%%writefile going_modular/train.py
"""
Trains a PyTorch image classification model using device-agnostic code.
"""

import os
import torch
import data_setup, engine, model_builder, utils

from torchvision import transforms

# Setup hyperparameters
NUM_EPOCHS = 5
BATCH_SIZE = 32
HIDDEN_UNITS = 10
LEARNING_RATE = 0.001

# Setup directories
train_dir = "data/pizza_steak_sushi/train"
test_dir = "data/pizza_steak_sushi/test"

# Setup target device
device = "cuda" if torch.cuda.is_available() else "cpu"

# Create transforms
data_transform = transforms.Compose([
  transforms.Resize((64, 64)),
  transforms.ToTensor()
])

# Create DataLoaders with help from data_setup.py
train_dataloader, test_dataloader, class_names = data_setup.create_dataloaders(
    train_dir=train_dir,
    test_dir=test_dir,
    transform=data_transform,
    batch_size=BATCH_SIZE
)

# Create model with help from model_builder.py
model = model_builder.TinyVGG(
    input_shape=3,
    hidden_units=HIDDEN_UNITS,
    output_shape=len(class_names)
).to(device)

# Set loss and optimizer
loss_fn = torch.nn.CrossEntropyLoss()
optimizer = torch.optim.Adam(model.parameters(),
                             lr=LEARNING_RATE)

# Start training with help from engine.py
engine.train(model=model,
             train_dataloader=train_dataloader,
             test_dataloader=test_dataloader,
             loss_fn=loss_fn,
             optimizer=optimizer,
             epochs=NUM_EPOCHS,
             device=device)

# Save the model with help from utils.py
utils.save_model(model=model,
                 target_dir="models",
                 model_name="05_going_modular_script_mode_tinyvgg_model.pth")
Woohoo!
Now we can train a PyTorch model by running the following line on the command line:
python train.py
Doing this will leverage all of the other code scripts we've created.
And if we wanted to, we could adjust our train.py file to use argument flag inputs with Python's argparse module, this would allow us to provide different hyperparameter settings like previously discussed:
python train.py --model MODEL_NAME --batch_size BATCH_SIZE --lr LEARNING_RATE --num_epochs NUM_EPOCHS
Exercises
Resources:
- Exercise template notebook for 05
- Example solutions notebook for 05
- Live coding run through of solutions notebook for 05 on YouTube
Exercises:
- Turn the code to get the data (from section 1. Get Data above) into a Python script, such as
get_data.py.- When you run the script using
python get_data.pyit should check if the data already exists and skip downloading if it does. - If the data download is successful, you should be able to access the
pizza_steak_sushiimages from thedatadirectory.
- When you run the script using
- Use Python's
argparsemodule to be able to send thetrain.pycustom hyperparameter values for training procedures.- Add an argument for using a different:
- Training/testing directory
- Learning rate
- Batch size
- Number of epochs to train for
- Number of hidden units in the TinyVGG model
- Keep the default values for each of the above arguments as what they already are (as in notebook 05).
- For example, you should be able to run something similar to the following line to train a TinyVGG model with a learning rate of 0.003 and a batch size of 64 for 20 epochs:
python train.py --learning_rate 0.003 --batch_size 64 --num_epochs 20. - Note: Since
train.pyleverages the other scripts we created in section 05, such as,model_builder.py,utils.pyandengine.py, you'll have to make sure they're available to use too. You can find these in thegoing_modularfolder on the course GitHub.
- Add an argument for using a different:
- Create a script to predict (such as
predict.py) on a target image given a file path with a saved model.- For example, you should be able to run the command
python predict.py some_image.jpegand have a trained PyTorch model predict on the image and return its prediction. - To see example prediction code, check out the predicting on a custom image section in notebook 04.
- You may also have to write code to load in a trained model.
- For example, you should be able to run the command
Extra-curriculum
- To learn more about structuring a Python project, check out Real Python's guide on Python Application Layouts.
- For ideas on styling your PyTorch code, check out the PyTorch style guide by Igor Susmelj (much of styling in this chapter is based off this guide + various similar PyTorch repositories).
- For an example
train.pyscript and various other PyTorch scripts written by the PyTorch team to train state-of-the-art image classification models, check out theirclassificationrepository on GitHub.